DIY Custom hand made hair clip in. Watch Tutorial Video

DIY Guide: Create Your Own Clip-In Hair Extensions at Home (Step-by-Step)

Have you ever wished for the perfect hair extensions, ones that you can customize to your liking? The freedom to choose the hair type, quality, and length of your hair extensions is an exciting opportunity. If this sounds too good to be true, let me assure you it’s not. You can absolutely create your own clip-in hair extensions at home, and it's simpler and quicker than you might think.

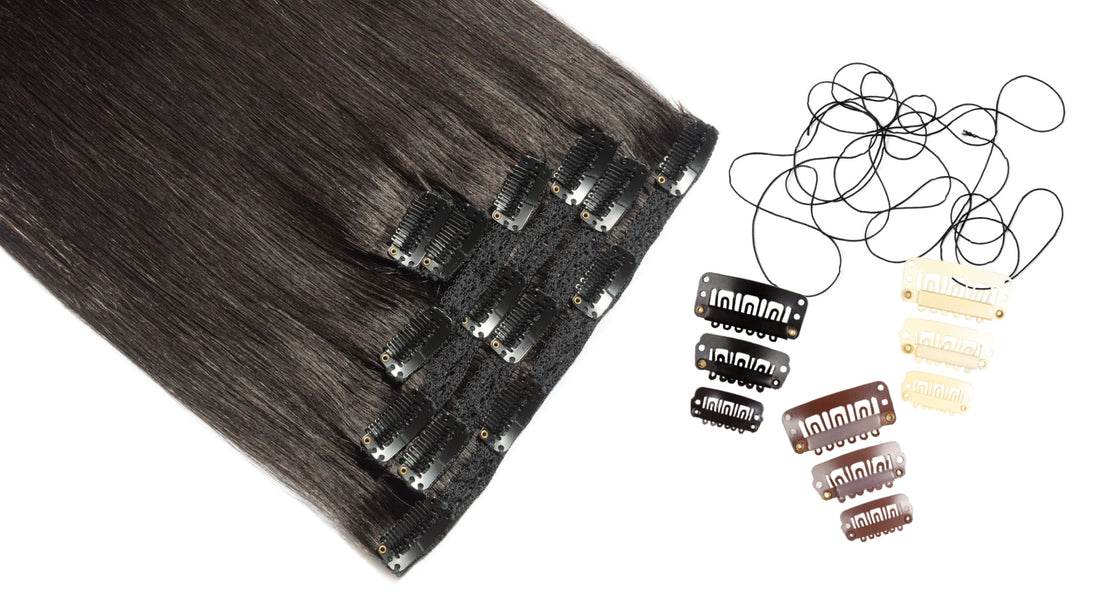
Before we dive into the DIY process, let's talk about what you'll need. Gather your premium virgin human hair wefts, wig clips, hair scissors, a curved sewing needle, thread, and optionally, a measuring tape.

You might be wondering why we don't recommend opting for buying loose bulk ‘ponytail hair’ for DIY clip-in extensions. While it's cost-effective, it's also time-consuming and challenging to transform (and difficult for some) to work with loose hair to try and create a weft on their own.

Remember, we're talking DIY, not hair torture!

We have provided an instructional video for your convenience. Alternatively, you can opt to read and follow the instructions below.


Decoding the DIY Clip In Process: All You Need to Know

Here’s our step-by-step process on how make your own clip-in hair extensions at home. 

Make sure you have everything... 

Checklist:


So, we do recommend premium virgin human hair wefts.

We also prefer to use human hair extensions because of the versatility in care and styling without damaging the extensions. You’ll be able to color, curl, flat iron, wash and cut natural hair wefts without worrying about damaging the hair. And they’ll look much closer to your real hair. 

For the type of human hair weft bundles, we’d recommend you take a look at Raw Human Hair Extensions  or Textured Curly Hair Extensions.


Step-by-step process to making clip-in hair extensions


Step 1: Prep the Weft

  1. Thread the Needle: Start by threading your needle, doubling the thread, and tying off the ends to ensure it is secure.
  2. Double the Wefts: Take your bundles, unwrap them, and double the wefts. This will provide a fuller look for your clip-ins.
  3. Sew the Wefts Together: Begin by sewing the ends securely, making sure the thread penetrates the weft to keep the ends flat. Continue to sew the wefted area together, going over the top for sections in the middle from one end to the next.


Step 2: Measure and Cut the Hair

  1. Measure the Nape: Start by measuring the nape of your neck, beginning and ending just within the hairline to ensure the edges of the extensions don't peek out. You can use a measuring tape or place the hair where it will be clipped in and then cut.
  2. Measure Ear to Ear: After completing the nape area, measure from ear to ear.
  3. Cut the Weft: Using your measurements, cut the weft from above down to the size you measured.


Step 3: Sew the Wefts Onto the Net

  1. Anchor Your Thread: Secure the end of your thread to the net with a small knot to anchor the weft.
  2. Position the Wefts: Place your first weft on the net according to your layout, ensuring proper measurement for even distribution.
  3. Sew the Wefts: Begin sewing the wefts onto the net. Sew 2-3 lines along each weft to ensure they are firmly attached. Maintain alignment for a seamless blend.
  4. Repeat for All Wefts: Continue this process for each weft piece. Ensure you match the measurements for consistency and sew 2-3 wefts for thorough coverage.


Step 4: Sew on the Clips

  1. Attach the Wig Clips: Position the wig clips with the comb on the outside and thread the needle through the weft and the clip. Use 2-5 clips depending on the width of the extension.
  2. Secure the Clips: Pass the thread through the hole on the clip at least twice to ensure it is secure.
  3. Check Clip Direction: Avoid sewing the wig clips with combs on backward by opening them before you start sewing. This ensures the combs open in the correct direction.


Where to buy Raw Human Hair Clip-in Hair extensions


Now that you’re clip-ins are ready, you can trim them up to blend in with your hair.

SL Raw Notes:

  • Do not sleep in your clip-ins, so remove them before bed
  • Do not glue on the wig clips as they won’t last as long as sewing them on


And that’s how you make your DIY clip-in extensions. Simple, easy, and affordable. 

And with care, you’ll be able to reuse your Premium Virgin Human Hair Clip-ins and have them last for several months.


Back to blog

Leave a comment

Please note, comments need to be approved before they are published.